Remark
I hate windows and Microsoft very much. No way a programmer can build the installation so unfriendly for user who dont have another windows machine in hand.
And OpenAI develop GPT, not Microsoft or Microsoft Research. Microsoft is just a company who buy the technology and use it for their own profit. Just a reminder.
Background
Due to automatic Windows update, my PC is corrupted due to failure of update. The old driver is deleted while the new driver imposed by Window update is failed. Therefore, all the keyboard or mouse is not working as the driver for unifying USB is no longer recognizable. I cannot even control my PC to enter the safe mode.
Luckily I have wired keyboard in hand. I tried to recover the system. The problem is getting worse as the system is corrupted. The recovery deleted VMD driver and therefore no hard disk is recognized.
I have no choice but to reinstall Windows 11. However, the installation is so unfriendly that I have to spend 2 days to figure out how to install it.
IRST driver and VMD support
Introduction of VMD
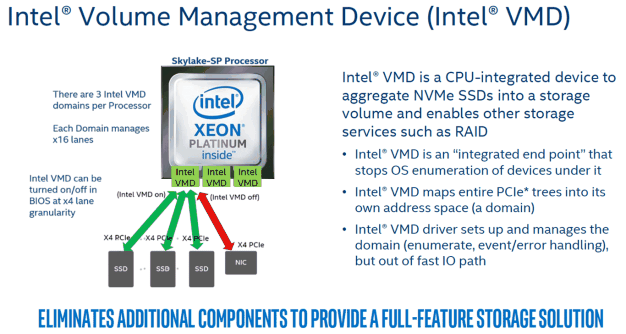
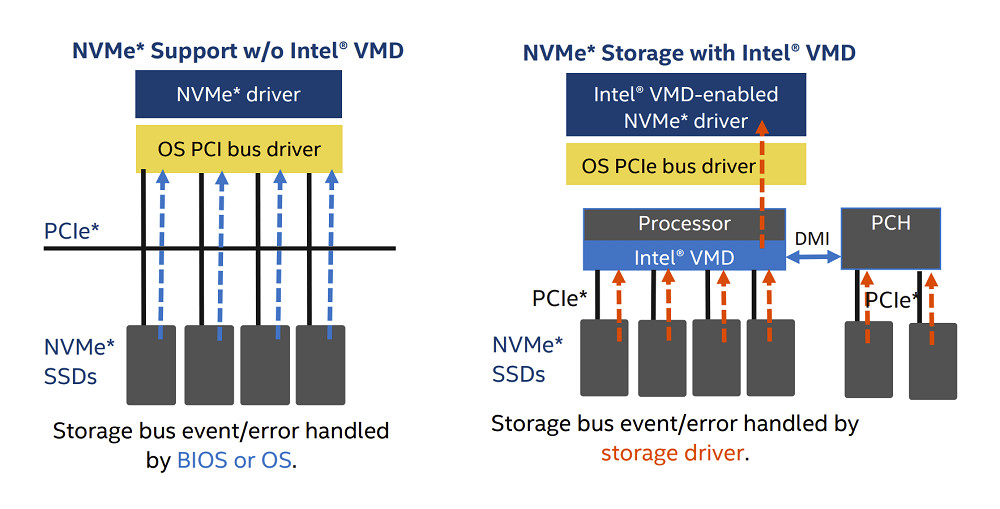
In the latest Intel platforms, Intel® Volume Management Device (Intel® VMD) is used to manage storage devices with the Intel® RST software.
The Intel VMD hardware generates ‘dummy’ devices for multi-function devices when mapped, these functions may be visible to the Windows® operating system.
Problem
In the old configuration, VMD is turned on, which is provided by Intel to support hot plug of M.2 SSD. However, the driver is deleted by recovery. Therefore, I cannot see any hard disk in the installation page.
The primary solution is to load the drive from USB on installation page, which require the drive “F6” to load the driver. However, Intel does not provide the zip file of F6. Instead they provide a RSTSetup.exe which is not executable by Linux or MacOS. Good Job Intel. Although the issue is raised to Intel forum, no practical solution provided.
They suggest a solution that is to use the RSTSetup.exe to install the driver from another Windows machine to the USB. Then the driver can be loaded in the installation page.
Solution
As VMD is not really a must for me, I can turn off the VMD support in exchange to recognition of hard disk. The solution is to enter the BIOS and turn off the VMD support. Then the hard disk can be recognized in the installation page. However, you need to erase the data in the old hard disks as the partition table with and without VMD is different.
Last but not least, VMD driver is provided by Motherboard manufacturer, as follows:
Creation of Windows 11 USB
Problem
In MacOS environment, the creation of Windows 11 USB is not easy. The official solution is to use the Media Creation Tool to create the USB. However, the tool is only available in Windows environment.
The reason is that the Windows 10/11 ISO file is larger than 4GB. Therefore, the USB is required to be formatted as NTFS. However, MacOS does not support NTFS format. Therefore, the USB cannot be created in MacOS.
The first attempt is to use a ISO burner available in macOS to burn a USB. However, the USB is not recognized in the BIOS as partition of file didn’t perform. The reason is that or the install.wim is larger than 4 GB, which is not recognizable in FAT32 format. Also, it is not possible to format the USB as NTFS in macOS as it is Microsoft property.
Solution
So you need two USB to install the windows. The step is as follows:
- Get TWO usb sticks, and format using macOS Disk Utility. First >2GB, FAT32, Master Boot Record (MBR). Second >8GB, formatted as exFAT, MBR.
- Download the Windows 10/11 ISO. Open on the Mac desktop.
- Copy everything EXCEPT “sources” folder onto FAT32 USB (drag and drop).
- On the same USB, create a folder called “sources”, and copy into it the one file “boot.wim” from the “sources” folder in the ISO
- Copy everything from the ISO onto the exFAT USB. It seems not to matter that some materials will appear on both USBs.
- Plug both USBs into the PC.
- The PC was able to boot from the FAT32 USB; and it found the install.wim file (and whatever else it needed) from the exFAT USB without any additional voodoo, and completed the install successfully.
The following command is used to burn the ISO file to USB. The command is executed in MacOS.
1
2
3
4
5
6
7
8
9
diskutil list external
diskutil eraseDisk MS-DOS "WIN_USB1" MBR disk[your disk1 number]
diskutil eraseDisk ExFAT "WIN_USB2" MBR disk[your disk2 number]
hdiutil mount [your ISO file name]
rsync -avh --progress --exclude=sources /Volumes/[your ISO file name]/ /Volumes/WIN_USB1/
mkdir /Volumes/WIN_USB1/sources
cp /Volumes/[your ISO file name]/sources/boot.wim /Volumes/WIN_USB1/sources/

rsync -avh --progress /Volumes/[your ISO file name]/ /Volumes/WIN_USB2
To check the disk number, you can use disk utility in MacOS.
Re-Installation of Windows 11
The installation of Windows 11 is not easy. Some hidden setting is required to be changed in BIOS.
Problem in first attempt
The first attempt is to install Windows 11 in the old configuration. However, the installation is failed due to the following error.

By ChatGPT, it said
1
2
3
4
5
6
7
8
9
10
11
12
13
14
15
The error code 0xc0000005 is a Windows operating system error that is also known as the "Access Violation" error. This error typically occurs when an application attempts to access a memory location that it is not authorized to access. There are several reasons why this error can occur, including:

1. Malware or virus infections that corrupt system files.
2. Faulty hardware, such as a failing hard drive or defective RAM.
3. Outdated or incompatible device drivers.
4. Corrupt or damaged system files.

To troubleshoot this error, you could try the following:

1. Scan your system for malware and viruses using a reputable security software.
2. Check your hardware components, such as the RAM and hard drive, for any signs of damage or failure.
3. Update your device drivers to the latest version.
4. Use the System File Checker (SFC) tool to scan and repair any damaged or corrupt system files.

If none of these solutions work, you may need to seek further assistance from a technical support professional.
TPM 2.0, Secure Boot, UEFI and PTT
To install Windows 11, harsh requirement must be fulfilled.
- The BIOS must support UEFI, which is supported by my motherboard (Z790 Steal Legend WiFi).
- Secure Boot is a configuration in BIOS. It must be turned on to install Windows 11.
- TPM is short for Trusted Platform Module. Until Windows 11 was announced, TPM was something not many people had heard of. It’s an added layer of protection so potential malware cannot access any credentials, encryption keys, and other very sensitive user data stored in your system. Think of the TPM as the fingerprint or facial recognition system on your smartphone. Without the correct biometrics, you can’t access any information.
- PTT is short for Platform Trust Technology. It is a firmware-based TPM version 2.0 solution. It is supported by my motherboard (Z790 Steal Legend WiFi) with Intel CPU.
Summary
The following is the step to install Windows 11.
- Enter BIOS and turn off VMD support.
- Enter BIOS and turn on Secure Boot.
- Enter BIOS and turn on PTT.
- Clear old TPM information in BIOS.
As the finger print is coded on TPM 2.0 chip (either Physical or Virtual) in the previous installation. To reinstall Windows 11 successfully, you must perform the clear step.
In my motherboard, a configuration called “Pending Operation” in trusted computing can be found. The only option is “clear TPM”. After clearing the TPM, the finger print is removed and the installation can be performed.
Also, the secure boot key should also be reset. The secure boot key is used to verify the integrity of the OS. If the secure boot key is not reset, the installation will be troubled by failure of boot.
The secure boot key can be reset by the following steps:
- Enter BIOS and switch Secure Boot to custom.
- Delete old secure key
- Switch the mode to setup and save the configuration.
Problem
The installation will be failed if the TPM is not cleared and new Windows key is provided. The error code is 0xc0000005. The error code 0xc0000005 is a Windows operating system error that is also known as the “Access Violation” error. This error typically occurs when an application attempts to access a memory location that it is not authorized to access.
In the installation, the error code 0xc0000005 is caused by the finger print in TPM. The finger print is not authorized to write the new Windows key. Therefore, the installation is failed.
Localization of Error
You can burn a new Windows 10 bootable USB to install in your PC. Before the installation, you must turn off all configuration related to TPM, such as PTT and trusted computing and secure booot etc. If the installation is successful, the problem is localized to the write access in TPM.
Round 2: Debug on Hardware Failure on Windows 10
Current Status
The installation of Windows 11 is failed due to the finger print in TPM. The finger print is not authorized to write the new Windows key. Therefore, the installation is failed.
During the installation, my noticable error is coming frequently. The error is 0xC000005. The error code 0xC000005 is a Windows operating system error that is also known as the “Access Violation” error.
This error typically occurs when an application attempts to access a memory location that it is not authorized to access.
During the installation of Windows 10, this error also occurs infrequently and cause the failure of installation.
After the success of installation of Windows 10, the error is still coming. When using the Chrome or Edge browser, sometimes the error “status access violation” occurs, which means the browser is not authorized to access the memory location.
Also, in game playing, the Unreal engine also reports the error “Unhandled Exception: EXCEPTION_ACCESS_VIOLATION writing address 0x0000028c16eabeee.”. For the REDEngine (Cyberpunk 2077), the game is not able to start. And for Unity Engine, the game is frequnetly crashed. Therefore, it is highly possible that the error is caused by the hardware failure.
Hardware Checking
When we deal with hardware failure, we should doubt the priority by the following order:
- SSD > RAM > Motherboard > CPU
- GPU
- PSU
The debug process is dependent on the error observed. More detail is described as follows:
Memory
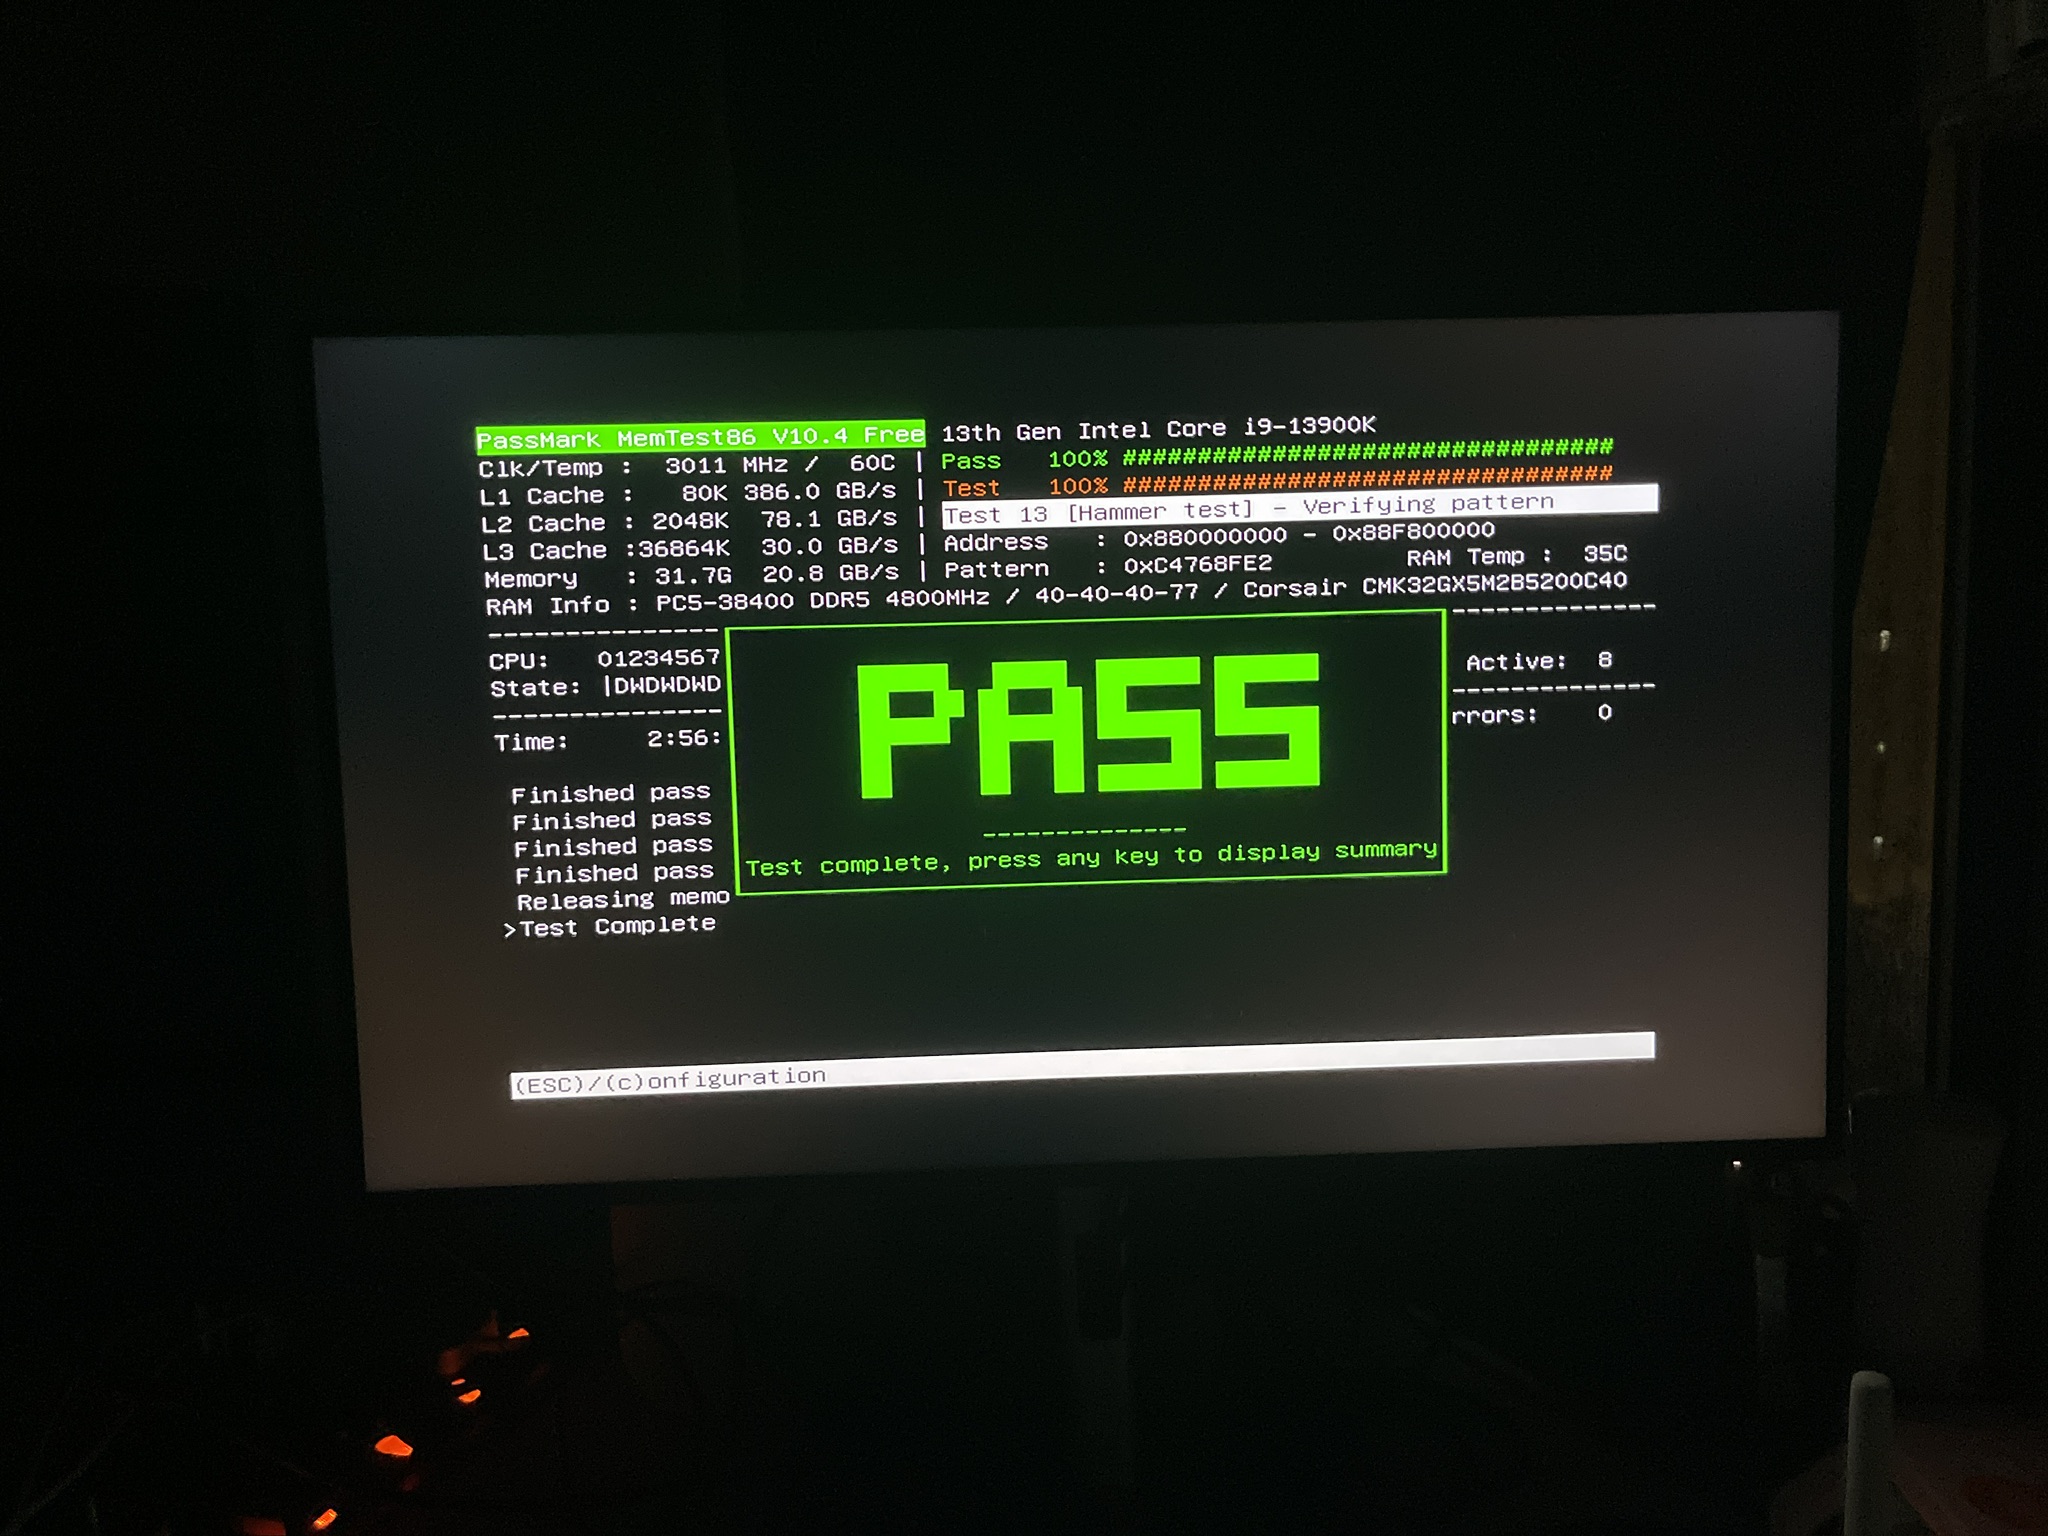
I have burned another USB for memtest86 to test whether the memory has potential error. My memory pass the test.
SSD
Bootable USB
I have burned another USB for Ubuntu to test whether the hard drives has bad sectors to cause the installation failure of Windows 11.
The following command is used to check the bad sectors in Ubuntu.
1
2
lsblk
sudo badblocks -v /dev/[your hard drive name, e.g sda, nvme0n1]
My hard drives pass the test.
In Windows Environment
The chkdsk command can be found in cmd for any Windows OS for SSD, as suggested here
To scan and recover any error in SSD, you may need to open an cmd prompt windows with administrator right, and input
1
chkdsk C: /r
which will require you to schedule a reboot to proceed the disk checking, as suggested here.
GPU
Usually, a GPU will be failed due to bad VRAM chip on the board. Instead of the GPU itself.
Some utitlity can be used to examine the GPU. The most reliable one for NVIDIA graphic card is the Mats, which is image that need to burn to USB.
However, the Mats is not able to detect the error in my GPU (RTX4090) as the tool is too old. You may find the latest version in taobao that support 4090 GPU.
Luckily, I have my old GPU (RTX2070) from my old PC. I have replaced the GPU and the error is still coming. Therefore, the GPU is not the cause of the error.
To double confirm, I have also taken out all GPU and enable the internal GPU (Intel UHD 770) from my CPU (Intel i9-13900K). The error still persist.
PSU
Usually, PSU failure will cause the black screen, system power off suddenly, or system reboot suddenly. However, in my cases, the error is memory access violation error and no power off or reboot is observed. Therefore, the PSU is not the cause of the error.
CPU
To test the function of Intel CPU, Intel has provided us with a simple tools Intel® Processor Diagnostic Tool. Only the Windows version has provided.
The tool is able to test the function of CPU in Windows platform. However, I always doubt that whether this test is valid as the test is not performed in a standalone environment, like memtest86 did.
Anyway, The test is passed. CPU is the most difficult part to be failed (by experience). And Intel accepts International RMA so that we can just override the vendor in Hong Kong. Let not bother this part for now.
Motherboard
The last part to be considered is the motherboard. The motherboard is the most difficult part to examine. More professional tool is subjected to test. It is far away from my expertise.
However, the memory test keep showning positive results. Therefore, I doubt the error is caused by motherboard. Regarding memory access. The following components are related:
- CPU Memory Controller

- Motherboard BUS between RAM and CPU
- RAM chip itself
The CPU is passed. The RAM is passed. Therefore, the motherboard is the most possible cause of the error.
I have planning to require RMA for the motherboard.